Zeitronix-DashDAQ Installation
|
Kit Components |
|
 |
|
|
|
|
|
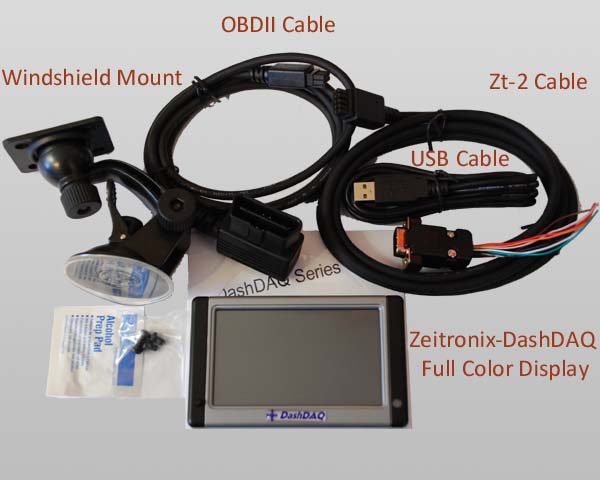
Zeitronix-DashDAQ Display |
Full color, touch screen display. |
|
Windshield Mount |
Sticks to your windshield using a suction cup and lever. The lever increases the suction when mounting and then
functions as a
quick release when removing the display. Direction and angles are
fully adjustable. |
|
Zt-2 Cable |
Connects to the Zt-2 Serial Data Cable and to back of
DashDAQ Display.
The Orange and Brown wiring allow for a Second Zt-2 to
be connected! (Dual-Zt-2 connector available separately) |
|
OBDII Cable |
Connect to your vehicles OBDII port. Both the Zt-2 cable and OBDII
cable can be used simultaneously. |
|
USB Cable |
Use this to connect the Zeitronix-DashDAQ display to a computer for software
updates and new features. |
Zeitronix-DashDAQ Display Installation Details
- Connect the DashDAQ display to the windshield mount using the included
hardware.
- If applicable connect the OBDII connector from the OBDII port to the back
of the DashDAQ display. The DashDAQ display will power up at this point.
- Connect the Zt-2 Cable from the Zt-2 serial cable to the back of the
DashDAQ display.
If no OBDII connector is being used connect the red and
black wires to power (+12v) and ground respectively to power the display.
Do not make this connection when the OBDII cable is in use.
If adding a 2nd
Zt-2 connect the "Dual-Zt-2" connector to the 2nd Zt-2's serial
data cable. Connect the orange and brown wires to the orange and brown wires
of the Zt-2 cable shown above.
- Mount the DashDAQ display on the windshield pulling down the lever to
secure it. Raise this lever to release the display from the windshield.
Zeitronix-DashDAQ Display RPM readout
If the Zeitronix RPM reading is too high or too low please set the "Number of
engine cylinders" parameter on the DashDAQ Display by following the
RPM question directions in the
DashDAQ FAQ.
Zeitronix-DashDAQ Related Downloads
Back to the Zeitronix-DashDAQ page
| 
