Overview
If connecting to a single temperature sensor to a 2010 model Zt-2 please follow
these
simple
installation instructions. For 2009/earlier model Zt-2s, the 2010 Model User1 input or DashDAQ Analog 1 and
2 inputs please see below for instructions.
Note on Zt-2 2010 Models: Temperature sensors are most easily setup on the 2010
Model Zt-2 User2 input. If there is no temperature sensor currently
connected to the User2 input then it is recommended to use the User2 input
instead. If an air or fluid temperature sensor is already connected on the User2
input these directions can be used to monitor a second sensor.
|
Air and Fluid Temperature
Sensor Operation
Air and Fluid
Temperature sensors work by changing their resistance as the temperature
changes. To read a change in resistance these sensor must be given a 5v
power source and be connected to a second resistor with a voltage reading being
taken in between the two. This type
of circuit is called a
voltage divider and will be detailed in the next section.
The User2 input on the Zt-2 Model
2010 does not require a 5v power and resistor connection. These
connections are made internally if the Zt-2 User2 input is configured for a
temperature sensor. The User1 input on all models of Zt-2 will require the
5v and resistor connection when using a temperature sensor. A question at
this point may be whether the Zt-2 EGT input can be used for air or fluid
temperature sensors. EGT probes use a different physical mechanism to read
temperature and so the EGT input is only usable with K-Type thermocouples, not
with air or fluid temperature sensors.
|
Zt-2 and Temperature Sensor
Connections
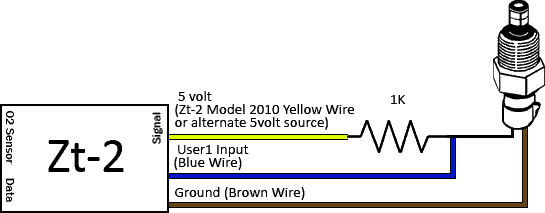
Connect the 1 KOhm resistor and air (or fluid) temperature sensor as follows:

|
Display Options
The Zt-2 User1 input and DashDAQ Analog 1 or Analog 2 inputs are able to
collect 0-5 volt data values. These values can be displayed by the Zt-2
LCD screen or DashDAQ touch screen as a voltage value. Both the
Zeitronix Data Logger Software (ZDL) and DashDAQ
can also convert and display this data as a temperature value.
Zeitronix Data Logger Software Setup
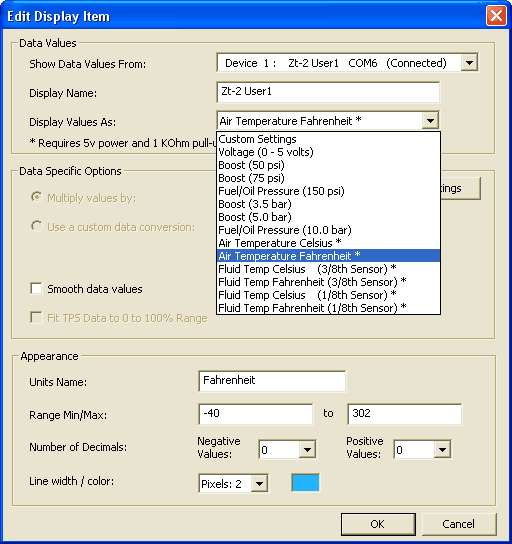
Edit the display of the User1
plot either through the menu or by right clicking on the User1 name on the right
side of the screen.
Select the temperature sensor used from the drop down list as shown below:
|

|
|
Support for this feature has
been added to ZDL version 3.0.8 BETA and later.
Please visit the
Zeitronix Data Logger Download Page
for updates.
DashDAQ Display Setup
The DashDAQ Analog 1 and 2 inputs can be configured to use the air and fluid
temperature sensors by adding a non-linear device and a configuration file to
the DashDAQ. You will need to delete the Analog 1 or 2 device and then add
the non-linear device which will use the Analog 1 or 2 input. Please consult the
DashDAQ manual for
additional information on setting up the non-linear device.
DashDAQ non-linear device configuration files for air and fluid temperature
sensors:
[3/8th Air Temp. Config.]
[3/8th Fluid Temp. Config]
[1/8th Fluid Temp. Config]
|

